
Using Google reCaptcha you can protect your website from spam. Form will not get submitted until the user selects a specific number of images according to the question from the captcha box.
In this tutorial, I show how you can add Google reCaptcha v2 in your form using Laravel reCaptcha package in Laravel 9.

Contents
- Get reCAPTCHA site and secret Keys
- Update .env
- Install laravel-recaptcha package
- Publish package
- Update recaptcha.php
- Clear caches
- Route
- Controller
- View
- Demo
- Conclusion
1. Get reCAPTCHA site and secret Keys
- Navigate to the following link and login into your account if not logged in.
- Following page will display.
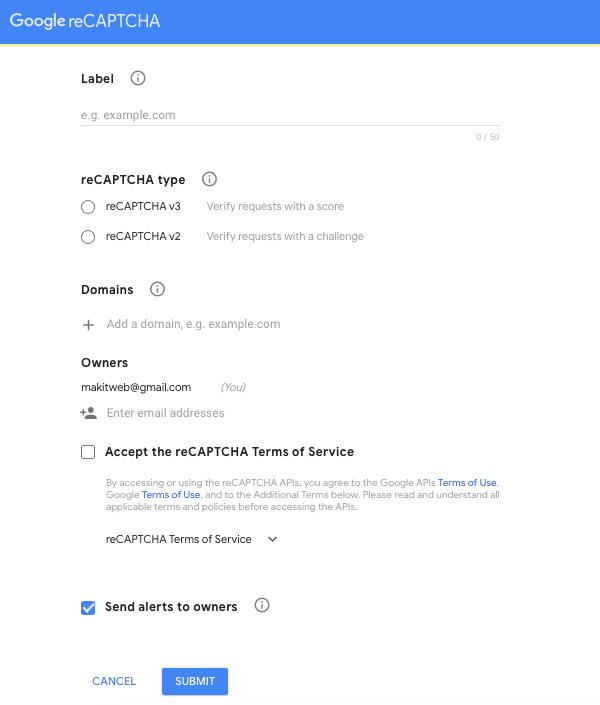
- Here, enter label, select reCAPTCHA v2 from the reCAPTCHA type, select
"I'm not a robot"Checkbox, enter your domain name without https e.g. makitweb.com. You can also specify localhost if you want to test it on your local system. - Check the
Accept the reCAPTCHA Terms of Serviceand click the Submit button.
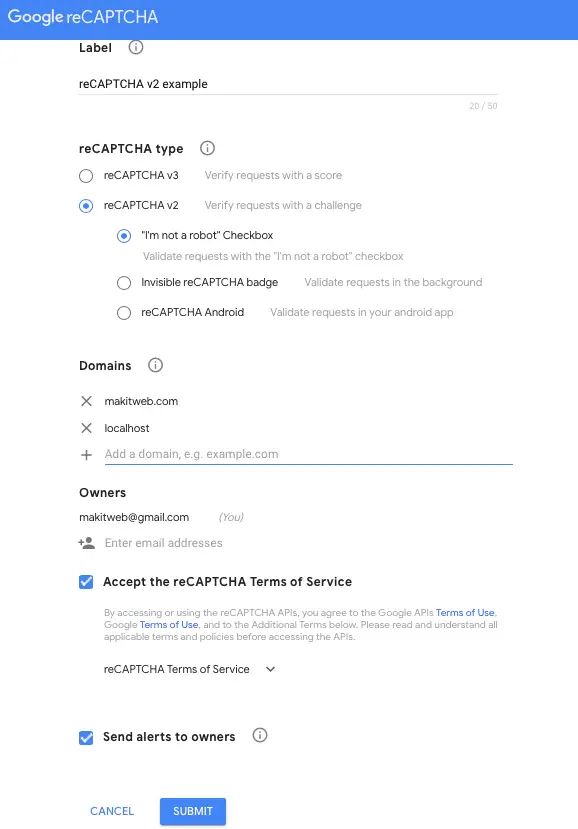
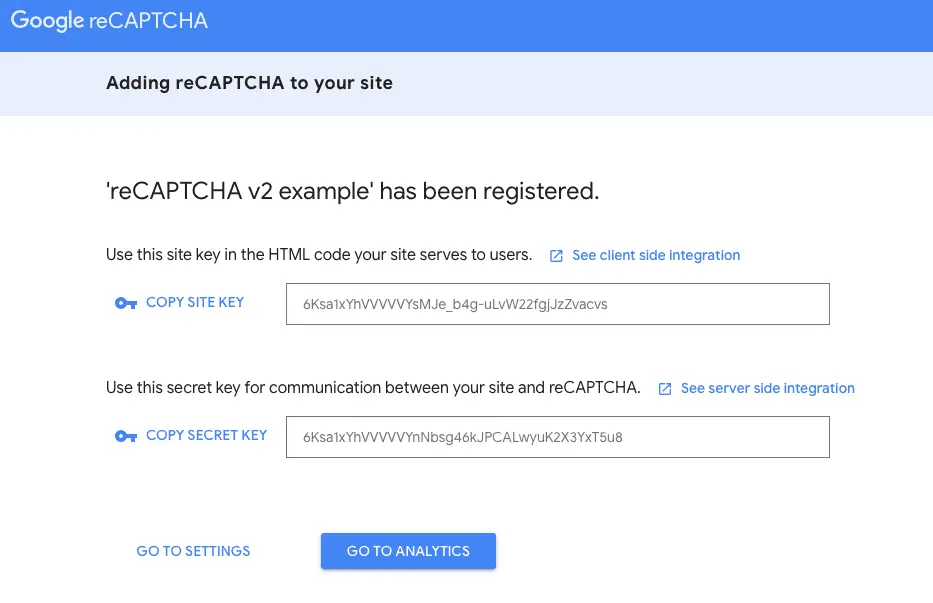
- Copy the site and secret keys.
2. Update .env
- Open
.envfile. - Create 2 variables for Google reCaptcha –
- RECAPTCHA_SITE_KEY – Assign copied site key.
- RECAPTCHA_SECRET_KEY – Assign copied secret key.
RECAPTCHA_SITE_KEY=6Ksa1xYhVVVVVYsMJe_b4g-uLvW22fgjJzZvacvs
RECAPTCHA_SECRET_KEY=6Ksa1xYhVVVVVYnNbsg46kJPCALwyuK2X3YxT5u8
3. Install laravel-recaptcha Package
Install the package using composer –
composer require biscolab/laravel-recaptcha
4. Publish package
Run the command –
php artisan vendor:publish --provider="Biscolab\ReCaptcha\ReCaptchaServiceProvider"
5. Update recaptcha.php
- Open
config/recaptcha.phpfile. - Make sure the
versionis set tov2, if not then set it to'v2'.
'version' => 'v2',
- Change
error_message_keyvalue. This stores reCaptcha error message. - I set it to
'Invalid recaptcha'.
'error_message_key' => 'Invalid recaptcha',
6. Clear caches
Run following command –
php artisan config:cache
7. Route
- Open
routes/web.phpfile. - Define 2 routes –
- / – Load index view.
- page/store – Handle form submit and validate reCaptcha.
Completed Code
<?php

use Illuminate\Support\Facades\Route;
use App\Http\Controllers\PageController;

Route::get('/', [PageController::class, 'index']);
Route::post('page/store', [PageController::class, 'store'])->name('page.store');
8. Controller
- Create
PageControllerController.
php artisan make:controller PageController
- Include Validator –
use Illuminate\Support\Facades\Validator; - Create 2 methods –
- index() – Load
indexview. - store() – Handle form submission.
- index() – Load
Validate the values. For recaptcha specified –
'g-recaptcha-response' => 'recaptcha',
If values are not validated then return to the page with errors otherwise use SESSION flash to store message and redirect the page.
Completed Code
<?php

namespace App\Http\Controllers;

use Illuminate\Http\Request;
use Illuminate\Support\Facades\Validator;
use Session;
class PageController extends Controller {

   public function index(){
      return view('index');
   }

   public function store(Request $request){

      $validator = Validator::make($request->all(), [
         'name' => 'required',
         'email' => 'required|email',
         'message' => 'required',
         'g-recaptcha-response' => 'recaptcha',//recaptcha validation
      ]);

      if ($validator->fails()) {
         return redirect()->Back()->withInput()->withErrors($validator);

      }else{
         Session::flash('message','Form submit Successfully.');
      }
      return redirect('/');
   }
}
9. View
Create index.blade.php file in resources/views/ folder.
Add {!! htmlScriptTagJsApi() !!} in <head> to include recaptcha js file.
Display bootstrap alert message if 'message' Session exists.
Create <form action="{{ route('page.store') }}" method="post">. Add some HTML elements.
Add {!! htmlFormSnippet() !!} to add google reCaptcha container.
Completed Code
<!DOCTYPE html>
<html lang="en">
<head>
<title>Adding Google reCAPTCHA v2 to form in Laravel</title>
<meta charset="utf-8">
<meta name="viewport" content="width=device-width, initial-scale=1">
<link rel="stylesheet" href="https://cdn.jsdelivr.net/npm/bootstrap@4.6.1/dist/css/bootstrap.min.css">
<script src="https://ajax.googleapis.com/ajax/libs/jquery/3.6.0/jquery.min.js"></script>
<script src="https://cdn.jsdelivr.net/npm/bootstrap@4.6.1/dist/js/bootstrap.min.js"></script>
<!-- Include script -->
{!! htmlScriptTagJsApi() !!}
</head>
<body>
<!-- Alert message (start) -->
@if(Session::has('message'))
<div class="alert alert-success">
{{ Session::get('message') }}
</div>
@endif
<!-- Alert message (end) -->
<div class="container">
<h2>Contact form</h2>
<form action="{{ route('page.store') }}" method="post">
@csrf
<div class="form-group">
<label for="name">Name:</label>
<input type="name" class="form-control" id="email" placeholder="Enter name" name="name" value="{{ old('name') }}">
@if($errors->has('name'))
<small class="text-danger">{{ $errors->first('name') }}</small>
@endif
</div>
<div class="form-group">
<label for="email">Email:</label>
<input type="email" class="form-control" id="email" placeholder="Enter email" name="email" value="{{ old('email') }}">
@if($errors->has('email'))
<small class="text-danger">{{ $errors->first('email') }}</small>
@endif
</div>
<div class="form-group">
<label for="message">Message:</label>
<textarea class="form-control" id="message" placeholder="Enter message" name="message">{{ old('message') }}</textarea>
@if($errors->has('message'))
<small class="text-danger">{{ $errors->first('message') }}</small>
@endif
</div>
<!-- Google reCaptcha v2 -->
{!! htmlFormSnippet() !!}
@if($errors->has('g-recaptcha-response'))
<div>
<small class="text-danger">{{ $errors->first('g-recaptcha-response') }}</small>
</div>
@endif
<button type="submit" class="btn btn-primary">Submit</button>
</form>
</div>
</body>
</html>
10. Demo
11. Conclusion
If you want to test the google reCaptcha on your system before deploying to the server then specify localhost under the domain section in reCaptcha setting.
Make sure to remove it after deploying it to the server.
You can view Google reCaptcha v3 implementation in Laravel 9 here.
If you found this tutorial helpful then don't forget to share.